Free domain that I mean here is certainly free domain from the provider that I recommend to pambaca in a previous post here, namely of www.co.cc or www.co.nr. However, now I will explain 1 only, ie free domain from www.co.cc. My consideration is that the free domain from www.co.cc long even though I use only for experimental material. Because using it relatively easy in my opinion. For those readers who may not have been familiar with the free domain that I mentioned just now, it's good to read my posting this. If interested in using it, please apply directly to www.co.cc.Supaya we discuss in a row, I will share a 2 part tutorial setting free this domain.
1. Setting Free Domain for Wordpress CMS
2. Setting Free Domain for Blogspot
Okay, we discussed one by one immediately begins setting free domain for Wordpress CMS
1. I assume the reader has done the transfer of your CMS WordPress web hosting online. We will be cited by using www.000webhost.comfree as for web hosting. The reader can read the tutorial here and here.
2. Please register on www.co.cc reader to get a free domain. You can register by clicking the menu Getting A New Domain or directly check availability to see if your desired domain name is still available or not. Both the same to me. If the domain name is still available, then you can use it.
3. If your account is verified and a free domain name you want already registered, then please login to your account at www.co.cc it.
4. Click the Manage Domains menu on the left of your account page.
5. The new domain is registered and has not adjusted to the website that will use the domain will look like the picture below. In this example the domain that I get is "banditbatak.com".
6. Click on any link Set up a Service Type column. You will be entered on the page as shown in the following figure. Please click the Set Up or domain Please click the link setup now.
7. Next will come the 3 options Set Up Domain. To WordPress CMS web we've hosted in www.000webhost.com before, we use the type Set Up first, the setting up DNS (Domain Name Server). For that, please click option: 1. Manage DNS.
8. You will be asked to enter into the Server Name text box on this option. From where do we get these Name Servers? Of these name servers are name servers of the server hosting that we use. Since we are using free hosting on www.000webhost.com, then the name servers that we use are from the free hosting. For that, go into your free hosting account at www.000webhost.com (how to get it you can read here). If you have successfully logged in, log into your account control panel, then on the Main Menu, click the View Account Details menu.
9. At the top you will see a table containing the Nameserver details from www.000webhost.com name servers. The first line is the name server 1, the second line is the name server 2, and so if there is more than 2 name servers.
10. Tersebutlah name servers that you entered into the search box in the account www.co.cc in step 8. Please come back again on the Set Up page domain name servers on www.co.cc to enter the name servers of these www.000webhost.com.
11. If you've entered, click the Set Up button on the bottom. There you are also told that it takes about 48 hours to match the changes you have done.
12. Is it enough to get there? We still need to do the settings in the webserver where we make our website hosting is on www.000webhost.com. If you get a free domain at www.co.cc first, then register on www.000webhost.com to get free hosting, then you can directly use co.cc domain and put it in a text box I want to host my own domain on the Create New Account page as shown below. If you set up DNS also been done, then the domain co.cc these can be used.
However, if you first register at www.000webhost.com and use a domain they gave, and then get a free domain from www.co.cc, then we need to setup on the hosting co.cc domain.
13. Please go back to your account control panel on www.000webhost.com. In the Domains section, click the menu button Parked Domains.
Parked domain here the intention is to make co.cc domain name that you have learned to be an alternative to open a web domain that you set this. That is like this, consider the original domain name of the web that we make these examples, namely "anakranto.comyr.com". This domain is a domain that is given by www.000webhost.com when registering on free hosting. Now, using this domain parked, then when parked domains opened in a browser, the content is visible is the contents of the original domain that is anakranto.comyr.com. Simply to say that your website will have 2 domain, namely anakranto, comyr.com and banditbatak.co.cc would you make as a parked domain. Thus, both can be used to open your website in your browser. In the field Park, enter the domain. Co.cc who want to use. For example enter "banditbatak.co.cc". After that click the Parked Domain.
14. If the process is run properly and successfully, then you just have to wait no more than 48 hours (depending on the time of the Set Up DNS for the domain you registered at www.co.cc) and have been able to use these free co.cc domain.
Please note that the domain settings for free domain and pay relatively the same domian. Although both have differences, but how his DNS settings are relatively similar. I deliberately use the free hosting and free domain as of this tutorial to be able to run by everyone. If you've considered using pay-pay hosting and domain, then you need to consider differences in both
Next:
* Setting free domain for Blogspot
* Summary Make a Website From Start to Finish and Ready Mix
So, do not go anywhere, please subscribe (unsubscribe) via email or feedreader tutorials to get updates first.
Moved Website From Localhost to Hosting online
We have learned how to create a website using Wordpress CMS on localhost. Reasons to use localhost also has been equally we know, that is for the sake of convenience and time efficiency and cost. Once we design a website with Wordpress CMS, modify, and so forth, we do the next step would host it online. Basically, we can save the website files on their computers. However, in order to be accessible by others from anywhere and anytime, the machine should remain stand-by and connected to the internet 24 hours a day. Sanggupkan we do all that? I think we'll get more losses. That is why we need a webserver that will provide hosting services to us. On this post, I will explain how to move the files you have built the website from localhost to hosting online. The hosting service we will use for a while is a free hosting service on a free hosting provider, namely www.000webhost.com. How to get free hosting service at 000webhost.Com I have presented. Please click here to open a tutorial on how to get free web hosting it. I assume the reader has to register and get free hosting services on these 000webhost.Com. Here are the steps we will do to move our website from localhost to hosting online:
1. Please login to get into your account at 000webhost.Com. Click the "Members Area" in the right hand menu.
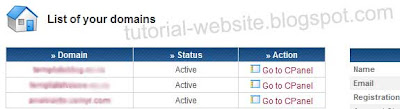
2. If the login is successful, we will go on the account page that displays a list of domains that you have registered on 000webhost.Com. One characteristic of 000webhost.Com is that the control panel for hosting distinguished for each domain. Please click the link "Go to CPanel" in the column "Action" on the chart domain.
3. You'll go to the Control Panel page of your account. Take a look at the Account Information section which is on the right. There is some important information that we will use before moving a file from localhost to hosting site online. Now consider again the Account Information section on the right of your Control Panel.
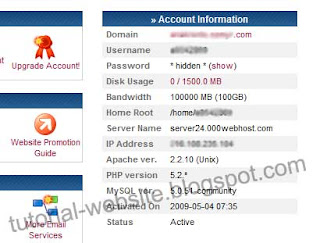
* Domain. Is the domain of the website we will store them online. On our website domain localhost is "http://localhost/webku" (according to the folder name of the website that we store on htdosc).
* Username. Is the username that we will use to access the file manager of our website. This username is different for each domain we have registered.
* Password. Is the password which we will use to access the file manager. Password is the same password that we use when logging into the 000webhost.Com.
* Home Root. It is a place where we will store our website files on the webserver. In localhost we save in "C: \ xampp \ htdocs \".
4. Now we will set up a database of our website first. In Control Panel, click the menu button on the MySQL Software / Services. You will be redirected to the page "Manage MySQL Databases".

5. Create a new database and new users who can access the database.
* MySQL database name. Is the name of the database that we will make to our website. If at localhost, database name that we make is like the picture in step 3 above, then later, the name of the database that we use is that is we make now.
* MySQL user name. Is the username that can access the database we have created. On localhost, username is "root".
* Passwords for MySQL users. Password that we will use to access the database that we created them. On the use Xampp localhost, the password does not exist (blank).
Please click the Create Database button on the bottom. If it is successful, please come back at the making of the new database. On the bottom you will see details of the database you have created in a table. You can also see the host information database shown in the MySQL Host column. If on the localhost, the database host that we use is "localhost", then in hosting this online, the database host that we use is shown in the table database.

6. Try to remember back to configuration settings that we are doing at the time of installing WordPress CMS on localhost. I recommend to open it again here.
The settings that we do as shown in the picture above is the arrangement at the localhost. Sehinnga, so that later we can open the website, we have to change the configuration settings in accordance with the webserver where we will host a website online. Now we'll change settings configuaration on Wordpress CMS website that we created on the localhost using the information we get from step 3 and step 5 to match the online hosting. Please open the file on your website that is in "C: \ xampp \ htdocs \ My Web" (according to the website folder name you installed). Find the file named "wp-config.php", then open the file using notepad, WordPad, or Dreamweaver.
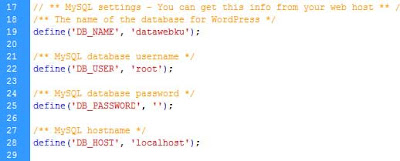
The picture above shows the configuration settings to localhost as you did when installing WordPress CMS on localhost.
* Replace "datawebku" which is on line 19 on the image with the database name you created in step 5 above
* Replace "root" which is on the line 22 on the picture with your username you created in step 5 above
* Enter the password that you created in step 5 above into the single quotation marks are there on the line 25 in the picture.
* Replace "localhost" which is on the line 28 in the picture with your username you created in step 5 above
After that, save again the file "wp-config.php" is.
7. Now it's time to upload the entire file into hosting our website online at 000webhost.Com. Go back to the Control Panel you like step 2 above. Click the File Manager menu button on the Files. You will go to the login page to enter the file manager. Use the username and password indicated on the Account Informatiion described in step 3.

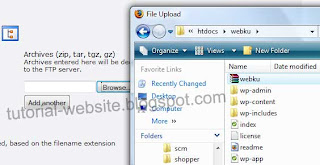
8. You will enter into the page file manager. Go into the folder "public_html", because in the folder tersebutlah we will upload the entire file to your website. If you have entered into the folder, click Upload an existing menu at the top. You will go to the Upload page and archive files. There are 2 ways to upload are available:
* Files. Used to upload files one by one. * Archive. Used to upload the files to be stored in the form of archive, that is. Zip,. Tar,. Tgz,. Gz.
We will use the second way for easier and not spend much time considering the WordPress CMS files belong to us very much. For that, we must first save the files Wordpress CMS website us into one of the archive. For example we are compressed into the form. Zip. Open the file on your website that is in "C: \ xampp \ htdocs \ My Web". Please note that we will not compress the folder "My Web" directly, but the contents of the foder "My Web" for the website will be directly visible when opened via a domain that is used, and no longer open the folder "My Web".
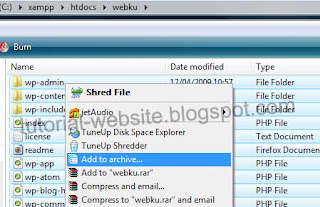
9. If it is compressed in the form. Zip, please return to the page you upload the file manager.
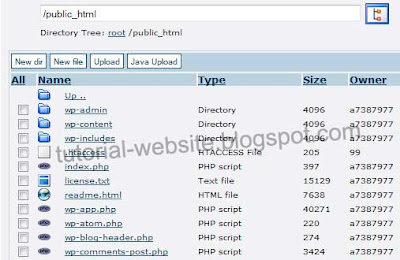
After that, click the green check sign at top left to submit or start to upload the archive. By default, the server system will extract the file in your file manager, so the result will be like the picture below.
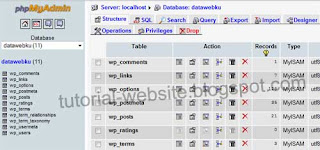
10. After you upload the files into online hosting, we also need to move a database of our own CMS Wordpress website to the webserver. Open your PHPMyAdmin on localhost with the opening address "http://localhost/phpmyadmin". Click the database that you use the Wordpress CMS website belongs to you. From the previous example, our database name is "datawebku".
Click the Export menu in the top. Save your database in the form. Sql. Give a name such as "datawebku.sql". You do this by selecting the options as a form of SQL databse file, then put checks in the Save as file, then click the Go button on the right sebalah.
11. Now back to the Control panel on 000webhost.Com. Click the menu button on the Software PhpMyAdmin / services. You will go into the phpMyAdmin Access. Click on the link Enter phpMyAdmin to the table List of current databases. You'll get to a page on 000webhost.Com PHPMyAdmin. The shape is not too different from the existing PHPMyAdmin on localhost because it uses the same software.
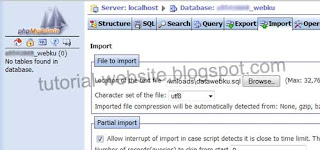
12. The next step is to enter a database that we keep from localhost earlier. Click the Import menu. In the File to import, click the Browse button and select the file "datawebku.sql" which we have previously exported from localhost. Then click the Go button next to bottom.
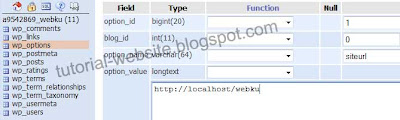
13. The final step is to change the URL of your website from "http://localhost/webku" is the domain that you have shown in the Account Information section which has been described in step 3. Still on PHPMyAdmin on hosting online, click the table "wp_options" (prefix depending on the time of installation) that exist in your database. Click the Browse menu to view the contents of the table. Edit the line "siteurl" to change the URL of your website. Replace "http://localhost/webku" is the domain of your website.
Finally finished already moving Wordpress CMS website from localhost to hosting online. If still there are steps that are still confusing, please do not hesitate to discuss through the comment box below. Good luck ...
1. Please login to get into your account at 000webhost.Com. Click the "Members Area" in the right hand menu.
2. If the login is successful, we will go on the account page that displays a list of domains that you have registered on 000webhost.Com. One characteristic of 000webhost.Com is that the control panel for hosting distinguished for each domain. Please click the link "Go to CPanel" in the column "Action" on the chart domain.

3. You'll go to the Control Panel page of your account. Take a look at the Account Information section which is on the right. There is some important information that we will use before moving a file from localhost to hosting site online. Now consider again the Account Information section on the right of your Control Panel.

* Domain. Is the domain of the website we will store them online. On our website domain localhost is "http://localhost/webku" (according to the folder name of the website that we store on htdosc).
* Username. Is the username that we will use to access the file manager of our website. This username is different for each domain we have registered.
* Password. Is the password which we will use to access the file manager. Password is the same password that we use when logging into the 000webhost.Com.
* Home Root. It is a place where we will store our website files on the webserver. In localhost we save in "C: \ xampp \ htdocs \".
4. Now we will set up a database of our website first. In Control Panel, click the menu button on the MySQL Software / Services. You will be redirected to the page "Manage MySQL Databases".

5. Create a new database and new users who can access the database.
* MySQL database name. Is the name of the database that we will make to our website. If at localhost, database name that we make is like the picture in step 3 above, then later, the name of the database that we use is that is we make now.
* MySQL user name. Is the username that can access the database we have created. On localhost, username is "root".
* Passwords for MySQL users. Password that we will use to access the database that we created them. On the use Xampp localhost, the password does not exist (blank).
Please click the Create Database button on the bottom. If it is successful, please come back at the making of the new database. On the bottom you will see details of the database you have created in a table. You can also see the host information database shown in the MySQL Host column. If on the localhost, the database host that we use is "localhost", then in hosting this online, the database host that we use is shown in the table database.

6. Try to remember back to configuration settings that we are doing at the time of installing WordPress CMS on localhost. I recommend to open it again here.

The settings that we do as shown in the picture above is the arrangement at the localhost. Sehinnga, so that later we can open the website, we have to change the configuration settings in accordance with the webserver where we will host a website online. Now we'll change settings configuaration on Wordpress CMS website that we created on the localhost using the information we get from step 3 and step 5 to match the online hosting. Please open the file on your website that is in "C: \ xampp \ htdocs \ My Web" (according to the website folder name you installed). Find the file named "wp-config.php", then open the file using notepad, WordPad, or Dreamweaver.

The picture above shows the configuration settings to localhost as you did when installing WordPress CMS on localhost.
* Replace "datawebku" which is on line 19 on the image with the database name you created in step 5 above
* Replace "root" which is on the line 22 on the picture with your username you created in step 5 above
* Enter the password that you created in step 5 above into the single quotation marks are there on the line 25 in the picture.
* Replace "localhost" which is on the line 28 in the picture with your username you created in step 5 above
After that, save again the file "wp-config.php" is.
7. Now it's time to upload the entire file into hosting our website online at 000webhost.Com. Go back to the Control Panel you like step 2 above. Click the File Manager menu button on the Files. You will go to the login page to enter the file manager. Use the username and password indicated on the Account Informatiion described in step 3.

8. You will enter into the page file manager. Go into the folder "public_html", because in the folder tersebutlah we will upload the entire file to your website. If you have entered into the folder, click Upload an existing menu at the top. You will go to the Upload page and archive files. There are 2 ways to upload are available:
* Files. Used to upload files one by one. * Archive. Used to upload the files to be stored in the form of archive, that is. Zip,. Tar,. Tgz,. Gz.
We will use the second way for easier and not spend much time considering the WordPress CMS files belong to us very much. For that, we must first save the files Wordpress CMS website us into one of the archive. For example we are compressed into the form. Zip. Open the file on your website that is in "C: \ xampp \ htdocs \ My Web". Please note that we will not compress the folder "My Web" directly, but the contents of the foder "My Web" for the website will be directly visible when opened via a domain that is used, and no longer open the folder "My Web".

9. If it is compressed in the form. Zip, please return to the page you upload the file manager.

After that, click the green check sign at top left to submit or start to upload the archive. By default, the server system will extract the file in your file manager, so the result will be like the picture below.

10. After you upload the files into online hosting, we also need to move a database of our own CMS Wordpress website to the webserver. Open your PHPMyAdmin on localhost with the opening address "http://localhost/phpmyadmin". Click the database that you use the Wordpress CMS website belongs to you. From the previous example, our database name is "datawebku".

Click the Export menu in the top. Save your database in the form. Sql. Give a name such as "datawebku.sql". You do this by selecting the options as a form of SQL databse file, then put checks in the Save as file, then click the Go button on the right sebalah.
11. Now back to the Control panel on 000webhost.Com. Click the menu button on the Software PhpMyAdmin / services. You will go into the phpMyAdmin Access. Click on the link Enter phpMyAdmin to the table List of current databases. You'll get to a page on 000webhost.Com PHPMyAdmin. The shape is not too different from the existing PHPMyAdmin on localhost because it uses the same software.
12. The next step is to enter a database that we keep from localhost earlier. Click the Import menu. In the File to import, click the Browse button and select the file "datawebku.sql" which we have previously exported from localhost. Then click the Go button next to bottom.

13. The final step is to change the URL of your website from "http://localhost/webku" is the domain that you have shown in the Account Information section which has been described in step 3. Still on PHPMyAdmin on hosting online, click the table "wp_options" (prefix depending on the time of installation) that exist in your database. Click the Browse menu to view the contents of the table. Edit the line "siteurl" to change the URL of your website. Replace "http://localhost/webku" is the domain of your website.

Finally finished already moving Wordpress CMS website from localhost to hosting online. If still there are steps that are still confusing, please do not hesitate to discuss through the comment box below. Good luck ...
Get Free Hosting
In this section I will explain how to get a free web hosting which I think is very good. Good because we are given the facilities and the hosting features that very much. Starting from a big hosting space, bandwidth is also large, with no banner advertisements from the provider, and much more. If curious please go directly www.000webhost.com. I will not linger to tell about the advantages possessed by 000webhost.Com it, but I'll explain how to get free webhosting from that provider. Here are the steps to get free hosting from 000webhost.Com:
1. Please open www.000webhost.com site, then click the Sign Up button menu in the menu next to the kana. Or can also click directly on the button below.
Register Here
2. Please fill out the form with the fields as follows: * I want to host my own domain. If you already have their own domain either free or paid, please fill in this section.
* Or, I will from choose your free subdomain. If you want to use the domain given by 000webhost.Com, then fill with your desired domain name * Your name. Fill in your name * Your e-mail. Fill with a valid email address, for verification will be done via e-mail account. * Password. Fill in the password you will use to login. * Type the password again. Rewrite your password
* Enter the number you see in the image. Enter the numbers you see in the above fields.
3. Check the part I agree to Terms Of Service. I recommend you read this rule. For if in violation, the 000webhost.Com will delete your account unilaterally, and this is already my alami.hik3x
4. If already registered, please open the email you registered it to open the account verification email sent by 000webhost.Com it. In the email there is already a guide to verify.
5. If you've been doing the verification, it means you have to login to the Member Area and click on the menu could use the services provided by 000webhost.Com secata ..!!! FREE Good luck.
 Member display picture arena (control panel) on 000webhost.Com
1. Please open www.000webhost.com site, then click the Sign Up button menu in the menu next to the kana. Or can also click directly on the button below.
Register Here
2. Please fill out the form with the fields as follows: * I want to host my own domain. If you already have their own domain either free or paid, please fill in this section.
* Or, I will from choose your free subdomain. If you want to use the domain given by 000webhost.Com, then fill with your desired domain name * Your name. Fill in your name * Your e-mail. Fill with a valid email address, for verification will be done via e-mail account. * Password. Fill in the password you will use to login. * Type the password again. Rewrite your password
* Enter the number you see in the image. Enter the numbers you see in the above fields.
3. Check the part I agree to Terms Of Service. I recommend you read this rule. For if in violation, the 000webhost.Com will delete your account unilaterally, and this is already my alami.hik3x
4. If already registered, please open the email you registered it to open the account verification email sent by 000webhost.Com it. In the email there is already a guide to verify.
5. If you've been doing the verification, it means you have to login to the Member Area and click on the menu could use the services provided by 000webhost.Com secata ..!!! FREE Good luck.

Difference Free Hosting and Pay
Hosting is a very important thing in the world of websites, because we have the website design will be in vain if not immediately and only a refinement hosted our computer hard drives, and others can not see it. So this blog will try to provide additional views on the ins and outs of web hosting. To get the hosting space, we can do it by buying (more precisely hire) of a paid hosting provider or get them from for free from free hosting providers that exist in this world. Good free hosting and pay the hosting of course there are no advantages and disadvantages. Here are a few differences from both:
A. Free hosting (free hosting) Pros:
* To be sure we get it free .. tis .. tis .. aka not pay at all.
Disadvantages:
* Space and bandwidth are limited. Need diperhatinkan that in choosing a hosting, the most important parameter to consider is space and bandwidth. Space associated with the available space as a place to store our website files, while the bandwidth is the limitation of data access per month. Regarding both these parameters, we will further discuss in subsequent posts.
* Features are limited hosting services such as email, databases, and-others
* In general there are banner ads from the free hosting providers that we use that appear on our web page,. This can reduce the aesthetics of the website because it is often haphazard placement of banners for automatic attached. However, there are also free hosting which allows us not display their banner.
* Minimal assistance if the experienced interference. Even so there is usually a response from the provider is quite long, but if not immediately corrected, will greatly affect our website, both in terms of brand and in terms of profit, if we utilize our website for the business.
* There is no insurance or guarantees in the use of the service. Next time an interruption occurs that causes damage to our website palign even a severe loss of all data website, we can not necessarily cast a free hosting providers claim to remember we get the service they are also free.
* Difficult terlisting on search engines like google and yahoo, because the possibility is considered as SPAM.
* Using a hosting service sometimes make people doubt the credibility of our website, especially if we use the website for the business. Certainly that appears is the doubts and fears of visitors and assume we are not serious because they do not want to spend the capital to the cost of hosting only. But perhaps for readers who do not use the website for the business, this is not a problem.
* It is possible that our account was closed unilaterally, and we just can not say anything as he bite the fingers.
* There may not selamaya free.
Yeah, although the lack of free hosting more than the excess, but excess is apparently still able to ignore kekurangannya.he3x.
B. Paid Hosting (pay hosting) Pros:
* Features a complete hosting. Although the features depend on hosting package we buy, but generally paid hosting features more complete than that for free. Melepasmu, cook ya iya donk, whose name was also paid, not in the hold-up man:)
* There are no banner ads from providers that appear on our website. Unless our own pairs.
* Help a fast and precise. Normally the response from customer service is much faster when we sent a question to ask for help. It becomes imperative for them because they certainly do not want consumers to be not satisfied that led to the loss of their own.
* More easily registered into the search engines like Google and Yahoo. This certainly has been accelerating others to visit our website because it can open them through search engines.
* There is a guarantee or insurance in using its services, sehigga we do not have to worry about data loss or damage occurred without any accountability. We can make demands on the service providers because we have paid them.
* The credibility we are more awake and can eliminate the doubts and fears of visitors, especially if we make buying and selling through our website. In addition, if we use the website for affiliate business, the advertiser would have more confidence and we consider more seriously.
Disadvantages:
* Costs incurred to get the hosting space is still very expensive. For example, at the time of this post is published, in one hosting provider in Indonesia that is www.dapurhosting.com, the cost to rent a space of 200 Mb with a bandwidth of 25 Gb is Rp 300,000 per year. For those readers who might just try to create a website of course it is quite burdensome.
Hopefully the above explanation could simply give an idea to be taken into consideration for the reader in getting a hosting service, and can complement the considerations which I have given in a previous post about hosting. Next we will discuss about the domain and pay the difference free domain as well as helpful tips in choosing a hosting and domain.
E-Book Guide To Use Wordpress CMS
Finally I can also post a new tutorial website today. In accordance with my promise to post about WordPress 
Download Ebook To Use Wordpress CMS
Download Support File

CMS installation a few days ago, so in this post I will share eBook Guide to Using Wordpress CMS. I provide this eBook free of charge to readers. Before that, I'm sorry to give it a little late. This is because I am a little busy preparing a training module for Wordpress CMS Lab assistant colleagues. SCM IT ITS. Hopefully they increasingly terbekali with web design field after last year also held a Joomla CMS training. So, readers who download the WordPress CMS guidelines will be more fortunate because Ebook WordPress CMS that I have provided is already in the previous trial.
In addition to the eBook Wordpress CMS, I also provide support files that will readers use when running the content of these guidelines.
In addition to the eBook Wordpress CMS, I also provide support files that will readers use when running the content of these guidelines.
Download Ebook To Use Wordpress CMS
Download Support File
how install wordpress cms on localhost
It was time this blog describes a web tutorial on how to install WordPress CMS on localhost. For those readers who may be new first read on this blog, I recommend to open the first post on localhost and localhost using XAMPP settings, so that among us there is a shared understanding. After that, the thing that is certainly needed is a Wordpress CMS module that can recognize the reader here and download it here. Here are the steps installing WordPress CMS on Localhost:
1. Extract the package first Wordpress CMS module that you have downloaded.
2. You will find a module located in a folder that is usually given the name "wordpress".
3. Move folder Wordpress CMS module named "wordpress" into the "C: \ xampp \ htdocs". The most important note is that storage should be done in the folder "htdocs". No problem installing XAMPP reader first time on drive D, F, or the other, most important of all web file reader should be placed in the folder "htdocs" is. Because when we open that web URL in your browser, the system that we use LocalServer XAMPP htdocs folder will read it and will search the web is meant to appear on the browser. Because the e-book that can guide readers XAMPP installation downloaded from here explained that XAMPP is installed in the path C: \, then we put it in C: \ xampp \ htdocs. That is why it is important to equate our perception.
CMS wordpress blog installation
4. If you are moving or copying and pasting the WordPress CMS modules, the reader may change the name of the folder "wordpress" as you see fit. To be equal, we will replace with a name such as "My Web".

CMS wordpress blog installation
5. Open a browser reader, and then type the address "http://localhost/phpmyadmin" in the address bar that appears phpMyAdmin page. We will create a database that will be used by wordpress CMS will we install. Relax, I'm not going to invite you to deal with the SQL language. Simply write the name of the database we will use in the box under the heading "Create new database". Suppose we give the name "datawebku". Then click the "Create" which is on the right.

6. Still in your browser, type in the address "http://localhost/webku" in its address bar. Note that the address depends on the naming of the folder you specified in step 4. Because we give a folder name is "My Web", then its URL address is "http://localhost/webku". However, if the reader gives a different name such as "web", then the address becomes "http://localhost/webnya". This means that we want displayed in the browser is a web that is in the folder "My Web". Actually, we could directly save the entire contents of the wordpress CMS module into the folder "htdocs" without having entered into the folder "My Web", so the address will be "http://localhost/". Usually this is done if we keep it online and wanted to open with our web address for example http://www.namadomain.com/ ", not" http://www.namadomain.com/webku ". However, to our easy manage web-web that we make by using localhost, web files should be included into a folder. Moreover, if we want to install or create any other web on the localhost, of course we do not want a web-web files mixed and irregular. Sekalian we learn management files.he3x.
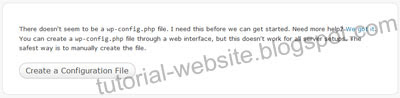
7. In the reader's browser will display an error wordpress like the picture below because there are no file named wp-confic.php. The file is a file that contains settings (configuration) for our CMS web WordPress. To create the configuration file, lik the button labeled "Create a Configuration File".
8. Next will come the page "Setup Configuration File" as follows. Click the button labeled "Let's Go!".
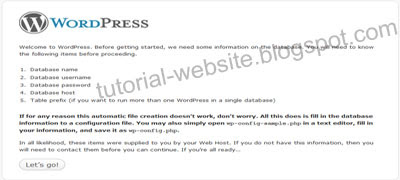
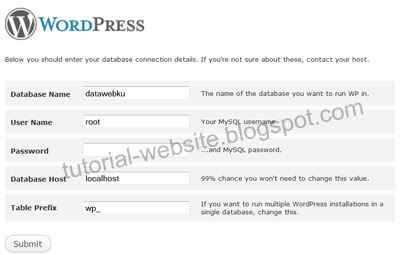
9. The next page that appears is a page of entries for the configuration settings.
* Dabase Name: fill in where the database that we created in step 5, the "datawebku".
* User Name: fill in with the username that has access to enter the phpMyAdmin on the server system that we use. For localhost with XAMPP, usually username is "root". Readers can open the e-book XAMPP installation guide to find out what user has access to the phpMyAdmin on localhost reader.
* Password: leave this blank. It has also been discussed in postings on the e-book guide to localhost XAMPP installation.
* Database Host: because we store / host our website on localhost, then fill it with "localhost".
* Table Prefix: used to mengunikkan tables in the database "datawebku". To temporarily use the default, ie "wp_".
After that klil Submit button.
10. If the settings are correct, then the page will appear as below. Click the Run the install.

11. Next you will be asked to fill in information about the web that you want with this CMS Wordpress.
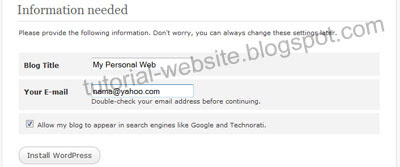
* Blog Title: content with the title of your website which will look at the title bar of the browser.
* Your E-mail: fill in your email address (you can fill with any e-mail if it does not have an email address).
* Check the boxes for the small box beside the words "Allow my blog to Appear ..." if you want a web that you want to appear on Google and Technorati.
After all feels right, click Install WordPress.
12. Finally Woredpress CMS installation on localhost works. Readers will be shown a username and password that will readers use to log into the administrator page on wordpress CMS reader. Do not close the first page. You have to remember or record the password if necessary.
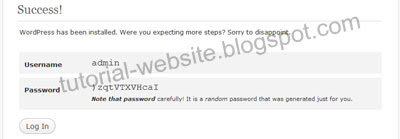
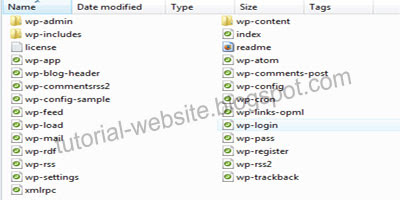
13. Next, open a new tab or wondow in your browser. We will try to go for the first time to page the administrator or to wordpress is usually called the "Dashboard". Type the address "http://localhost/webku/wp-admin". The address is the address of the web WordPress CMS Dashboard pages that you have installed it. Enter the appropriate username and password that has been shown in step 12.
14. For the reader easy access to the Dashboard reader, you should change the password provided earlier with a password that you will remember. I click the menu "Users" which is on the left side Dashboar your wordpress. Will be shown a list of existing users. Click on the user "Admin" to change the information used by the Admin.
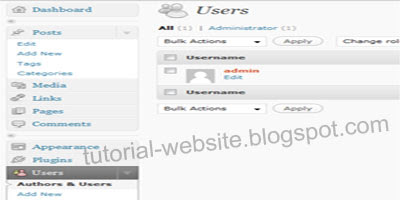
See the bottom section will have a field for new password. Fill with your desired password in the box beside the words "New Password", then click the Update Profile.
To see how wordpress CMS you have installed, please type in the browser with the address "http://localhost/webku". And this is the entire web files wordpress CMS. You no longer need to bother making these pages to sink ditumpukan script MySQL PHP programming language. In just a few steps, you've got a whole website. CMS wordpress blog installation
1. Extract the package first Wordpress CMS module that you have downloaded.
2. You will find a module located in a folder that is usually given the name "wordpress".
3. Move folder Wordpress CMS module named "wordpress" into the "C: \ xampp \ htdocs". The most important note is that storage should be done in the folder "htdocs". No problem installing XAMPP reader first time on drive D, F, or the other, most important of all web file reader should be placed in the folder "htdocs" is. Because when we open that web URL in your browser, the system that we use LocalServer XAMPP htdocs folder will read it and will search the web is meant to appear on the browser. Because the e-book that can guide readers XAMPP installation downloaded from here explained that XAMPP is installed in the path C: \, then we put it in C: \ xampp \ htdocs. That is why it is important to equate our perception.

CMS wordpress blog installation
4. If you are moving or copying and pasting the WordPress CMS modules, the reader may change the name of the folder "wordpress" as you see fit. To be equal, we will replace with a name such as "My Web".

CMS wordpress blog installation
5. Open a browser reader, and then type the address "http://localhost/phpmyadmin" in the address bar that appears phpMyAdmin page. We will create a database that will be used by wordpress CMS will we install. Relax, I'm not going to invite you to deal with the SQL language. Simply write the name of the database we will use in the box under the heading "Create new database". Suppose we give the name "datawebku". Then click the "Create" which is on the right.

6. Still in your browser, type in the address "http://localhost/webku" in its address bar. Note that the address depends on the naming of the folder you specified in step 4. Because we give a folder name is "My Web", then its URL address is "http://localhost/webku". However, if the reader gives a different name such as "web", then the address becomes "http://localhost/webnya". This means that we want displayed in the browser is a web that is in the folder "My Web". Actually, we could directly save the entire contents of the wordpress CMS module into the folder "htdocs" without having entered into the folder "My Web", so the address will be "http://localhost/". Usually this is done if we keep it online and wanted to open with our web address for example http://www.namadomain.com/ ", not" http://www.namadomain.com/webku ". However, to our easy manage web-web that we make by using localhost, web files should be included into a folder. Moreover, if we want to install or create any other web on the localhost, of course we do not want a web-web files mixed and irregular. Sekalian we learn management files.he3x.
7. In the reader's browser will display an error wordpress like the picture below because there are no file named wp-confic.php. The file is a file that contains settings (configuration) for our CMS web WordPress. To create the configuration file, lik the button labeled "Create a Configuration File".

8. Next will come the page "Setup Configuration File" as follows. Click the button labeled "Let's Go!".

9. The next page that appears is a page of entries for the configuration settings.
* Dabase Name: fill in where the database that we created in step 5, the "datawebku".
* User Name: fill in with the username that has access to enter the phpMyAdmin on the server system that we use. For localhost with XAMPP, usually username is "root". Readers can open the e-book XAMPP installation guide to find out what user has access to the phpMyAdmin on localhost reader.
* Password: leave this blank. It has also been discussed in postings on the e-book guide to localhost XAMPP installation.
* Database Host: because we store / host our website on localhost, then fill it with "localhost".
* Table Prefix: used to mengunikkan tables in the database "datawebku". To temporarily use the default, ie "wp_".
After that klil Submit button.
10. If the settings are correct, then the page will appear as below. Click the Run the install.

11. Next you will be asked to fill in information about the web that you want with this CMS Wordpress.

* Blog Title: content with the title of your website which will look at the title bar of the browser.
* Your E-mail: fill in your email address (you can fill with any e-mail if it does not have an email address).
* Check the boxes for the small box beside the words "Allow my blog to Appear ..." if you want a web that you want to appear on Google and Technorati.
After all feels right, click Install WordPress.
12. Finally Woredpress CMS installation on localhost works. Readers will be shown a username and password that will readers use to log into the administrator page on wordpress CMS reader. Do not close the first page. You have to remember or record the password if necessary.

13. Next, open a new tab or wondow in your browser. We will try to go for the first time to page the administrator or to wordpress is usually called the "Dashboard". Type the address "http://localhost/webku/wp-admin". The address is the address of the web WordPress CMS Dashboard pages that you have installed it. Enter the appropriate username and password that has been shown in step 12.
14. For the reader easy access to the Dashboard reader, you should change the password provided earlier with a password that you will remember. I click the menu "Users" which is on the left side Dashboar your wordpress. Will be shown a list of existing users. Click on the user "Admin" to change the information used by the Admin.

See the bottom section will have a field for new password. Fill with your desired password in the box beside the words "New Password", then click the Update Profile.

To see how wordpress CMS you have installed, please type in the browser with the address "http://localhost/webku". And this is the entire web files wordpress CMS. You no longer need to bother making these pages to sink ditumpukan script MySQL PHP programming language. In just a few steps, you've got a whole website. CMS wordpress blog installation

Subscribe to:
Posts (Atom)