1. Please login to get into your account at 000webhost.Com. Click the "Members Area" in the right hand menu.
2. If the login is successful, we will go on the account page that displays a list of domains that you have registered on 000webhost.Com. One characteristic of 000webhost.Com is that the control panel for hosting distinguished for each domain. Please click the link "Go to CPanel" in the column "Action" on the chart domain.

3. You'll go to the Control Panel page of your account. Take a look at the Account Information section which is on the right. There is some important information that we will use before moving a file from localhost to hosting site online. Now consider again the Account Information section on the right of your Control Panel.

* Domain. Is the domain of the website we will store them online. On our website domain localhost is "http://localhost/webku" (according to the folder name of the website that we store on htdosc).
* Username. Is the username that we will use to access the file manager of our website. This username is different for each domain we have registered.
* Password. Is the password which we will use to access the file manager. Password is the same password that we use when logging into the 000webhost.Com.
* Home Root. It is a place where we will store our website files on the webserver. In localhost we save in "C: \ xampp \ htdocs \".
4. Now we will set up a database of our website first. In Control Panel, click the menu button on the MySQL Software / Services. You will be redirected to the page "Manage MySQL Databases".

5. Create a new database and new users who can access the database.
* MySQL database name. Is the name of the database that we will make to our website. If at localhost, database name that we make is like the picture in step 3 above, then later, the name of the database that we use is that is we make now.
* MySQL user name. Is the username that can access the database we have created. On localhost, username is "root".
* Passwords for MySQL users. Password that we will use to access the database that we created them. On the use Xampp localhost, the password does not exist (blank).
Please click the Create Database button on the bottom. If it is successful, please come back at the making of the new database. On the bottom you will see details of the database you have created in a table. You can also see the host information database shown in the MySQL Host column. If on the localhost, the database host that we use is "localhost", then in hosting this online, the database host that we use is shown in the table database.

6. Try to remember back to configuration settings that we are doing at the time of installing WordPress CMS on localhost. I recommend to open it again here.

The settings that we do as shown in the picture above is the arrangement at the localhost. Sehinnga, so that later we can open the website, we have to change the configuration settings in accordance with the webserver where we will host a website online. Now we'll change settings configuaration on Wordpress CMS website that we created on the localhost using the information we get from step 3 and step 5 to match the online hosting. Please open the file on your website that is in "C: \ xampp \ htdocs \ My Web" (according to the website folder name you installed). Find the file named "wp-config.php", then open the file using notepad, WordPad, or Dreamweaver.
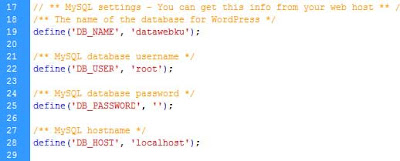
The picture above shows the configuration settings to localhost as you did when installing WordPress CMS on localhost.
* Replace "datawebku" which is on line 19 on the image with the database name you created in step 5 above
* Replace "root" which is on the line 22 on the picture with your username you created in step 5 above
* Enter the password that you created in step 5 above into the single quotation marks are there on the line 25 in the picture.
* Replace "localhost" which is on the line 28 in the picture with your username you created in step 5 above
After that, save again the file "wp-config.php" is.
7. Now it's time to upload the entire file into hosting our website online at 000webhost.Com. Go back to the Control Panel you like step 2 above. Click the File Manager menu button on the Files. You will go to the login page to enter the file manager. Use the username and password indicated on the Account Informatiion described in step 3.

8. You will enter into the page file manager. Go into the folder "public_html", because in the folder tersebutlah we will upload the entire file to your website. If you have entered into the folder, click Upload an existing menu at the top. You will go to the Upload page and archive files. There are 2 ways to upload are available:
* Files. Used to upload files one by one. * Archive. Used to upload the files to be stored in the form of archive, that is. Zip,. Tar,. Tgz,. Gz.
We will use the second way for easier and not spend much time considering the WordPress CMS files belong to us very much. For that, we must first save the files Wordpress CMS website us into one of the archive. For example we are compressed into the form. Zip. Open the file on your website that is in "C: \ xampp \ htdocs \ My Web". Please note that we will not compress the folder "My Web" directly, but the contents of the foder "My Web" for the website will be directly visible when opened via a domain that is used, and no longer open the folder "My Web".
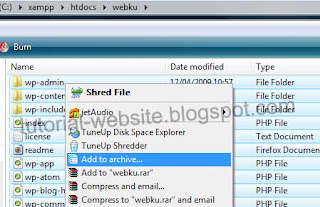
9. If it is compressed in the form. Zip, please return to the page you upload the file manager.
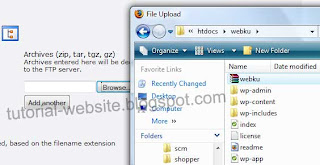
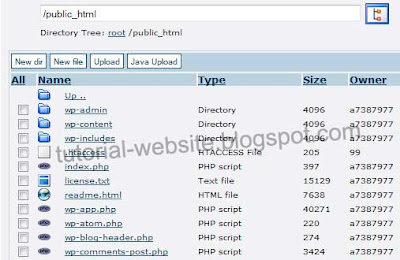
After that, click the green check sign at top left to submit or start to upload the archive. By default, the server system will extract the file in your file manager, so the result will be like the picture below.
10. After you upload the files into online hosting, we also need to move a database of our own CMS Wordpress website to the webserver. Open your PHPMyAdmin on localhost with the opening address "http://localhost/phpmyadmin". Click the database that you use the Wordpress CMS website belongs to you. From the previous example, our database name is "datawebku".
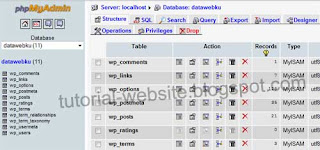
Click the Export menu in the top. Save your database in the form. Sql. Give a name such as "datawebku.sql". You do this by selecting the options as a form of SQL databse file, then put checks in the Save as file, then click the Go button on the right sebalah.
11. Now back to the Control panel on 000webhost.Com. Click the menu button on the Software PhpMyAdmin / services. You will go into the phpMyAdmin Access. Click on the link Enter phpMyAdmin to the table List of current databases. You'll get to a page on 000webhost.Com PHPMyAdmin. The shape is not too different from the existing PHPMyAdmin on localhost because it uses the same software.
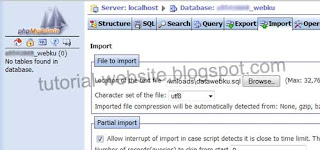
12. The next step is to enter a database that we keep from localhost earlier. Click the Import menu. In the File to import, click the Browse button and select the file "datawebku.sql" which we have previously exported from localhost. Then click the Go button next to bottom.
13. The final step is to change the URL of your website from "http://localhost/webku" is the domain that you have shown in the Account Information section which has been described in step 3. Still on PHPMyAdmin on hosting online, click the table "wp_options" (prefix depending on the time of installation) that exist in your database. Click the Browse menu to view the contents of the table. Edit the line "siteurl" to change the URL of your website. Replace "http://localhost/webku" is the domain of your website.

Finally finished already moving Wordpress CMS website from localhost to hosting online. If still there are steps that are still confusing, please do not hesitate to discuss through the comment box below. Good luck ...